DIGITALON Email Hosting Services
We offer world-class email services to our clients, powered by RackSpace Technology. Our email hosting services are highly secure, reliable, and easy to use. The key features of our email hosting services include:
- Large storage of 25GB
- Free email aliases: additional email addresses that point to existing mailboxes, without having to create separate mailboxes.
- Free email forwarding: you can forward the emails in your mailboxes to other mailboxes hosted on and outside DIGITALON.
- Genuine support: just contact us if you face any issues regarding your emails.
DIGITALON configures all of the above features for you at no additional costs. Simply enjoy the world-class email services.
How to Configure My Email Client?
We are using IMAP to keep a copy of your emails over your Rackspace account; this will allow you to use multiple email clients at once.
- Your Name: Your Name or Business Name
- Login Name: Your email address sent by the DIGITALON team
- Password: Your password sent by the DIGITALON team
- Account Type: IMAP
- Incoming Mail Server: secure.emailsrvr.com
- Outgoing Mail Server: secure.emailsrvr.com
- Incoming Mail Server (IMAP) TCP Port: 993 (SSL)
- Outgoing Mail Server (SMTP) TCP Port: 465 (SSL)
Please click the following step-by-step guides for further details:
Configure Your Windows Mail Client
Configure Your MS Outlook Mail Client
Configure Your iOS Mail Client
Configure Your Mozilla Thunderbird Mail Client
Accessing Your Emails Through Webmail
In addition to your email client, you can also access your mailbox online through webmail
- Go to: https://cloudways.mymailsrvr.com
- login ID: your email address
- login password: Your password sent by the DIGITALON team
Additional Information
You do not need to read through the following information if your mailbox setup in the previous sections has completed.
General Settings for Email Clients
The following table provides the setup information related to different protocols for connecting Rackspace with different devices.
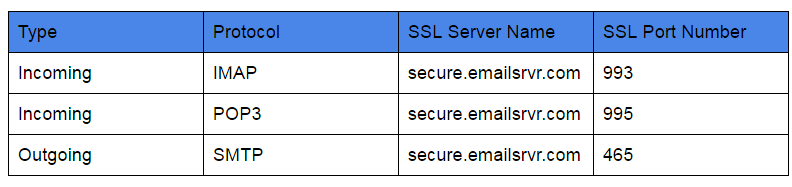
- Open your email client software (eg., Ourlook).
- Go to Settings.
- Enter your first and last name. This is the name that will appear in the From field of messages that you send.
- Enter your email address (e.g., myname@mydomain.com).
- Incoming email server type – Select IMAP from the list.
- Incoming mail server – Enter: secure.emailsrvr.com
- Port: 993
- Outgoing e-mail server (SMTP) name – Enter: secure.emailsrvr.com
- Port: 465
- Select the Outgoing server which requires authentication checkbox.
- Save the Settings.
iOS Settings
To use your Rackspace mail via your IOS:
- From the home screen on your device, click on Settings and then Mail.
- Tap Add Account, Tap Other, and then Add Mail Account.
- Enter the following information in the fields provided.
- Name – This is the name that will appear in the “From” field of messages you send.
- Address – Enter your entire email address (e.g., yourname@yourdomain.com).
- Password – Enter the password for your email account.
- Description – This description will only be visible to you.
- Select IMAP and then add both the Incoming and Outgoing Mail Server information:
- Hostname – secure.emailsrvr.com
- User Name – Enter your entire email address (e.g., user@example.com).
- Password – Enter the password for your email account (even if optional).
- Click Save to save all the settings.
Outlook Settings
To integrate your outlook for using your Rackspace mail:
- Click Settings.
- Under Options > Connected Accounts.
- Under Add a connected account, click other email account.
- Type your Rackspace email id and password.
- Click Ok.
- Choose the IMAP connection.
- Click Ok.
You can refer to this link for more details.

